利用github pages建立Serverless个人博客
概述
使用github pages,可以在github上部署静态网站。利用这个功能,可以很方便地实现个人博客的发布托管。
比如我的个人博客:Buttering’s Blog
对应代码仓库:buttering/EasyBlog: 自动将本地博客部署到github中展示
相关技术
1. 博客处理
采用go语言对md格式的博客进行处理,主要目的是处理文档中的图片,将其保存在图床,并将文档中的图片链接替换为图床链接。
2. 图床
采用github仓库直接作为图床。图片和博客存放在同一个仓库中。
3. Hexo博客框架
Hexo是一个快速、简洁且高效的博客框架,能很方便地生成静态的博客网站。采用Fluid主题。
4. CI/CD流程
采用github actions,自动实现博客上传后网站的生成和部署。
5. 更多功能
实现
0. 项目框架
项目所有文章和图片都位于同一个github仓库中:
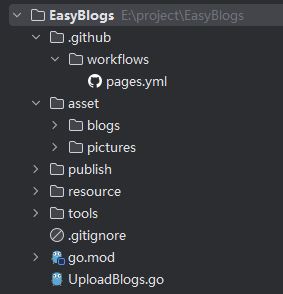
- .github:存放github action的配置文件
- asset:存放处理后的博客和图片,pictures起到了图床的作用
- publish:Hexo部署在此子目录
- resource:存放githubPub公钥
- tools:一些自己写的工具函数
- UploadBlogs:实现博客处理和自动push的脚本
1. 博客预处理
对md格式的博客进行预处理,使用正则表达式提取其中的图片路径:
- 对于本地图片,直接将其拷贝到asset/pictures目录中;
- 对于网络图片,将其下载在asset/pictures目录中。
在pictures目录中,对文章名和图片进行了哈希处理,如图:
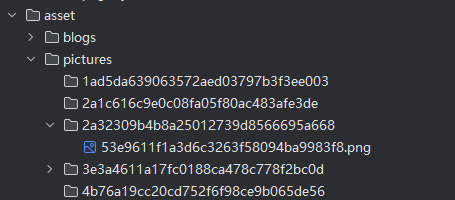
博客则直接按照原文件名放在blogs目录下。
博客中图片的链接会被替换为形如 https://raw.githubusercontent.com/buttering/EasyBlogs/master/asset/pictures/bdf03a9b9bdacaaf60d1f899c0222865/74d51bfa109b4065ccb3ba37b6922bb3.png 的url。
raw.githubusercontent.com 是github用来存储用户上传文件的服务地址。
1
2
3
4
5
6
7
8
9
10
11
12
13
14
15
16
17
18
19
20
21
22
23
24
25
26
27
28
29
30
31
32
33
34
35
36
37
38
39
40
41
42
43
44
45
46
47
48
49
50
51
52
53
54
55
56
57
58
59
60
61
62
63
64
65
66
67
68
69
70
71
72
73
74
75
76
77
78
79
80
81
82
83
84
85
86
87
88
89
90
91
92
93
94
95
96
97
98
99
100
101
102
103
104
105
106
107
108
109
110
111
112
113
114
115
116
117
118
119
120
121
122
123
124
125
126
127
128
129
130
131
132
133
134
135
136
137
138
139
140
141
142
143
144
145
146
147
148
149
150
151
152
153
154
155
156
157
158
159
160
161
162
163
164
165
166
167
168
169
170
171
172
173
174
175
176
177
178
179
180
181
182
183
184
185
186
187
188
189
190
191
192
193
194
195
196
197
198
199
200
201
202
203
204
205
206
207
208
209
210
211
212
213
214
215
216
217
218
219
220
221
222
223
224
225
226
227
228
229
230
231
232
233
234
235
236
237
238
239
240
241
242
243
244
245
246
247
248
249
250
251
252
253
254
255
256
257
258
259
260
261
262
263
264
265
266
267
268
269
270
271
272
273
274
275
276
277
278
279
280
281
282
283
284
285
286
287
288
289
290
291
292
| package main
import (
"EasyBlogs/tools"
"fmt"
"github.com/go-git/go-git/v5"
"github.com/go-git/go-git/v5/plumbing/object"
"github.com/go-git/go-git/v5/plumbing/transport/ssh"
"io"
"log"
"net/http"
"net/url"
"os"
"path"
"path/filepath"
"regexp"
"strings"
"time"
)
type markdownPicture struct {
isUrl bool
sourcePicturePath string
start int
end int
hashName string
targetUrl string
}
type Blog struct {
name string
hashName string
pictures []markdownPicture
directoryPath string
legal bool
}
var (
BLOG_PATH string
PICTURE_PATH string
REPOSITORY_URL string
)
func getBlogList(path string) (blogsList []Blog) {
blogsList = make([]Blog, 0, 10)
fileList, err := os.ReadDir(path)
if err != nil {
panic(err)
}
for _, file := range fileList {
if !file.IsDir() && filepath.Ext(file.Name()) == ".md" {
fileName := file.Name()
blogsList = append(blogsList, Blog{fileName, tools.Hash(fileName), nil, path, false})
}
}
return
}
func extractPicture(blog *Blog) {
isUrl := func(path string) bool {
return strings.HasPrefix(path, `http://`) || strings.HasPrefix(path, `https://`)
}
content, err := os.ReadFile(filepath.Join(blog.directoryPath, blog.name))
if err != nil {
println(err)
return
}
re, _ := regexp.Compile(`!\[.*?]\((.*?)\)`)
matches := re.FindAllSubmatchIndex(content, -1)
for _, match := range matches {
start := match[2]
end := match[3]
picturePath := string(content[start:end])
var pictureName string
if isUrl(picturePath) {
u, err := url.Parse(picturePath)
if err != nil {
println("解析图片url:", picturePath, " 失败")
continue
}
pictureName = path.Base(u.Path)
} else if filepath.IsAbs(picturePath) {
pictureName = filepath.Base(picturePath)
} else {
picturePath = filepath.Join(blog.directoryPath, picturePath)
pictureName = filepath.Base(picturePath)
}
hashName := tools.Hash(pictureName) + path.Ext(pictureName)
blog.pictures = append(
blog.pictures,
markdownPicture{
isUrl(picturePath),
picturePath,
start,
end,
hashName,
REPOSITORY_URL + "/" + blog.hashName + "/" + hashName,
},
)
}
blog.legal = true
}
func copyBlog(blog *Blog) {
fmt.Println("拷贝博客:“" + blog.name + "”")
blogTargetPath := filepath.Join(BLOG_PATH, blog.name)
pictureTargetPath := filepath.Join(PICTURE_PATH, blog.hashName)
if _, err := os.Stat(blogTargetPath); !os.IsNotExist(err) {
println("文章“" + blog.name + "”已经存在")
blog.legal = false
return
}
if err := os.Mkdir(pictureTargetPath, 0777); err != nil {
println("为博客“" + blog.name + "”创建对应picture文件夹失败")
blog.legal = false
return
}
content, _ := os.ReadFile(filepath.Join(blog.directoryPath, blog.name))
offset := 0
for _, picture := range blog.pictures {
start := picture.start + offset
end := picture.end + offset
content = append(content[:start], append([]byte(picture.targetUrl), content[end:]...)...)
offset += len(picture.targetUrl) - (end - start)
}
err := os.WriteFile(blogTargetPath, content, 0644)
if err != nil {
println("复制文件“" + blog.name + "”错误")
blog.legal = false
}
}
func copyPicture(blog Blog) {
pictureTargetPath := filepath.Join(PICTURE_PATH, blog.hashName)
for _, picture := range blog.pictures {
fmt.Println("导入图片:“" + picture.sourcePicturePath + "”")
var sourceFile interface{}
if picture.isUrl {
for i := 0; i < 5; i++ {
response, err := http.Get(picture.sourcePicturePath)
if err == nil && response.StatusCode == http.StatusOK {
sourceFile = response.Body
break
}
time.Sleep(50 * time.Millisecond)
}
if sourceFile == nil {
println("下载图片“" + picture.sourcePicturePath + "”失败")
continue
}
} else {
file, err := os.Open(picture.sourcePicturePath)
if err != nil {
println("打开图片“" + picture.sourcePicturePath + "”失败")
continue
}
sourceFile = file
}
destinationFile, _ := os.Create(filepath.Join(pictureTargetPath, picture.hashName))
_, err := io.Copy(destinationFile, sourceFile.(io.Reader))
if err != nil {
println("复制图片“" + picture.sourcePicturePath + "”失败")
}
}
}
func gitOperate(blogList []Blog) {
if len(blogList) == 0 {
return
}
repositoryPath, _ := filepath.Abs(".")
r, err := git.PlainOpen(repositoryPath)
if err != nil {
println("打开仓库失败")
return
}
w, err := r.Worktree()
if err != nil {
println("打开仓库失败")
println(err.Error())
return
}
_, err = w.Add("./asset")
if err != nil {
println("向仓库添加文件失败")
println(err.Error())
return
}
status, _ := w.Status()
println("git 状态:")
println(status.String())
nameList := tools.Map(blogList, func(blog Blog) string {
return blog.name
})
var summary string
if len(nameList) == 1 {
summary = fmt.Sprintf("提交文件 [%s]", blogList[0].name)
} else {
summary = fmt.Sprintf(
"提交 %d 个博客\n"+
"\n"+
"文件列表: [%s]",
len(blogList),
strings.Join(nameList, ", "),
)
}
commit, err := w.Commit(summary, &git.CommitOptions{
Author: &object.Signature{
Name: "Wang",
When: time.Now(),
},
})
obj, _ := r.CommitObject(commit)
fmt.Println("提交文件:")
fmt.Println(obj.String())
privateKey, err := ssh.NewPublicKeysFromFile("git", "./resource/githubPublicKey", "")
if err != nil {
println(err.Error())
}
for i := 0; i < 3; i++ {
err = r.Push(&git.PushOptions{
RemoteName: "origin",
RemoteURL: `git@github.com:buttering/EasyBlogs.git`,
Auth: privateKey,
Progress: os.Stdout,
})
if err == nil {
break
}
println("第 %d 次上传失败")
}
if err != nil {
println("重试次数已达上限,上传失败")
return
}
fmt.Println("提交成功!")
}
func init() {
path, _ := filepath.Abs(".")
BLOG_PATH = filepath.Join(path, "asset", "blogs")
PICTURE_PATH = filepath.Join(path, "asset", "pictures")
REPOSITORY_URL = `https://raw.githubusercontent.com/buttering/EasyBlogs/master/asset/pictures`
}
func main() {
filePath := "E:/desktop/blog"
blogList := getBlogList(filePath)
for i := range blogList {
extractPicture(&blogList[i])
copyBlog(&blogList[i])
copyPicture(blogList[i])
}
if len(blogList) == 0 {
return
}
gitOperate(blogList)
}
|
2. 引入Hexo框架
Hexo框架的使用方式很简单,只需使用Hexo CLI建立基本框架,而后将博客和相关资源移入指定文件夹,然后运行Hexo服务器即可。这里为实现Serverless,后两部交由github action实现。
安装Hexo并初始化站点
保证电脑中安装了Node.js。Hexo的部署目录为publish。
1
2
3
4
| npm install -g hexo-cli
nexo init publish
cd publish
npm install
|
执行后,Hexo会自动在publish目录建立一个空白站点,目录如下:
1
2
3
4
5
6
7
| .
├── _config.yml
├── package.json
├── scaffolds
├── source
| └── _posts
└── themes
|
- _config.yml:站点的配置文件
- _posts:Hexo会自动将其中的文档转化为静态资源
- themes:主题文件夹
安装fluid主题
初始的Hexo站点已经很完善了,但是为了更加个性化,安装了fluid主题:配置指南 | Hexo Fluid 用户手册 (fluid-dev.com)
1
2
|
npm install --save hexo-theme-fluid
|
然后在博客目录下创建 _config.fluid.yml,将主题的 _config.yml(位于publish\themes\fluid_config.yml)内容复制进去。这个_config.fluid.yml是主题的覆盖配置,之后要自定义主题,只需修改其中的内容即可。
修改publish下的_config.yml如下:
1
2
| theme: fluid
language: zh-CN
|
最后创建主题的关于页
测试博客
自此,一个本地的博客网站即搭建成功,可以尝试手动将文档移入_post文件夹,而后在命令行内的 publish 文件夹下运行 hexo g 和 hexo s ,就可以在浏览器看到博客。
最后记得使用hexo clean 清空生成的文件,避免影响到后面的部署。
3. github actions配置
在预处理函数的最后一步,实现了git的自动提交和推送。在成功向github推送后,就轮到github action实现博客网站的自动部署了。
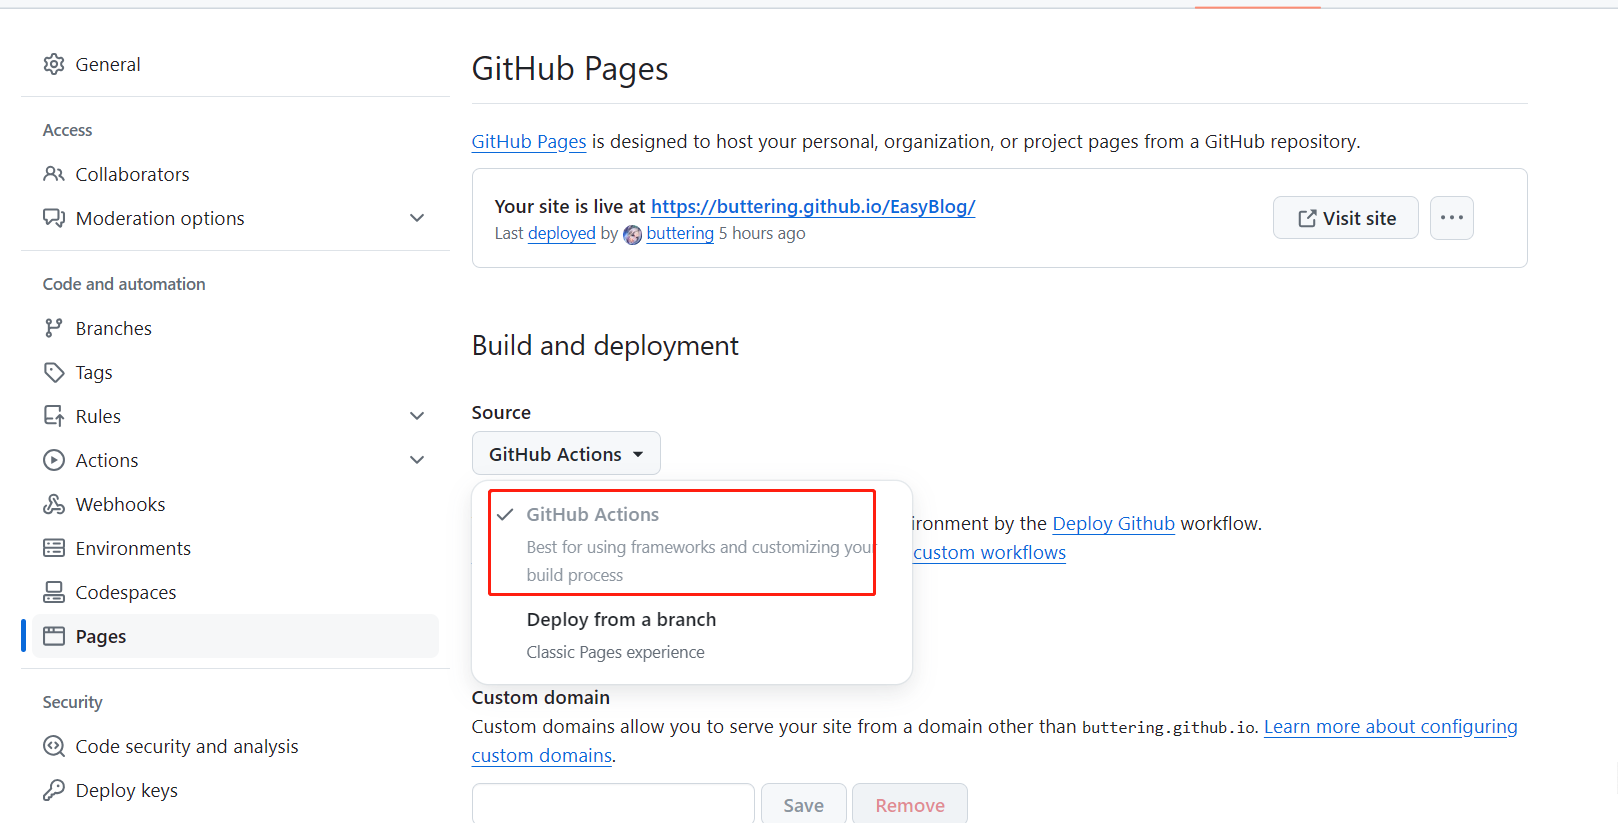
配置github仓库
首先将本地的git仓库上传至github,且设置为公开。
进入github 项目的设置页面开启page功能。设置Source为GitHub Actions。
编写actions脚本文件
回到本地,在项目根目录创建 .github/workflows/xxx.yml 文件。
这里需要一些github actions的知识,简单地说 Actions 就是在设定的时机触发创建一个虚拟云环境,然后执行一连串动作,从而实现自动部署的功能。
可以直接复制以下内容:
1
2
3
4
5
6
7
8
9
10
11
12
13
14
15
16
17
18
19
20
21
22
23
24
25
26
27
28
29
30
31
32
33
34
35
36
37
38
39
40
41
42
43
44
45
46
47
48
49
50
51
52
53
54
55
56
57
58
59
60
61
62
63
64
65
66
67
68
69
70
71
| name: Deploy Github
on:
push:
branches:
- master
workflow_dispatch:
jobs:
build:
runs-on: ubuntu-latest
steps:
- name: 检出仓库
uses: actions/checkout@v4
- name: Install pandoc
run: |
cd /tmp
wget -c https://github.com/jgm/pandoc/releases/download/2.14.0.3/pandoc-2.14.0.3-1-amd64.deb
sudo dpkg -i pandoc-2.14.0.3-1-amd64.deb
- name: 安装Node.js 18
uses: actions/setup-node@v4
with:
node-version: '18'
- name: Cache NPM dependencies
uses: actions/cache@v4
with:
path: node_modules
key: ${{ runner.OS }}-npm-cache
restore-keys: |
${{ runner.OS }}-npm-cache
- name: 安装相关依赖
working-directory: publish
run: |
npm install --silent --no-fund
npm un hexo-renderer-marked --save
npm i hexo-renderer-markdown-it-plus --save
- name: 复制博客文件
run: |
cd publish
rm -rf source/_posts
mkdir source/_posts
cp -rf ../asset/blogs/* ./source/_posts/
- name: 构建网站
working-directory: publish
run: npm run build
- name: Upload Pages artifact
uses: actions/upload-pages-artifact@v3
with:
path: ./publish/public
deploy:
needs: build
permissions:
pages: write
id-token: write
environment:
name: github-pages
url: ${{ steps.deployment.outputs.page_url }}
runs-on: ubuntu-latest
steps:
- name: Deploy to GitHub Pages
id: deployment
uses: actions/deploy-pages@v4
|
github 工作流在完成了环境的初始化后,会自动将位于 asset/blog 中的博客文件复制到 publish/source/_post 目录内。而后的构建步骤,工作流就会利用 _post 目录中的博客文件生成网站。
修改配置
编辑 _config.yml,将 url: 更改为 <你的 GitHub 用户名>.github.io/<repository 的名字>。
提交并自动部署
在提交前,记得编辑.gitignore文件:
1
2
3
| /resource/githubPublicKey
/publish/node_modules/
/publish/public/
|
在之后的每次提交,都会触发actions流程,生成站点。部署完成后,前往 https://<你的 GitHub 用户名>.github.io/<repository 的名字> 查看站点。
4. 开启latex功能
hexo默认的渲染器不支持复杂的数学公式。
Latex的渲染分为前端渲染和后端渲染两种方法,这里选择后端渲染,需要更换渲染器(已经在actions脚本中完成了)。
1
2
| npm un hexo-renderer-marked --save
npm i hexo-renderer-markdown-it-plus --save
|
修改 _config.fluid.yml:
1
2
3
4
5
| post:
math:
enable: true
specific: false
engine: katex
|
使用hexo-renderer-markdown-it-plus插件进行latex渲染时,如果使用mathjax,一些不完全符合md语法的标题会渲染失败(如一级标题前没有空行),因此要将引擎改为katex。
可以参考配置指南 | Hexo Fluid 用户手册 (fluid-dev.com) 和 CHENXCHEN/hexo-renderer-markdown-it-plus
5. 实现评论功能
使用 Giscus插件,且基于 GitHub Discussion实现评论功能。
开启 GitHub Discussion
进入github仓库->Settings->General->Features,勾选 Discussions。

安装 Github Apps
点击链接GitHub Apps - giscus ,为本仓库安装应用。
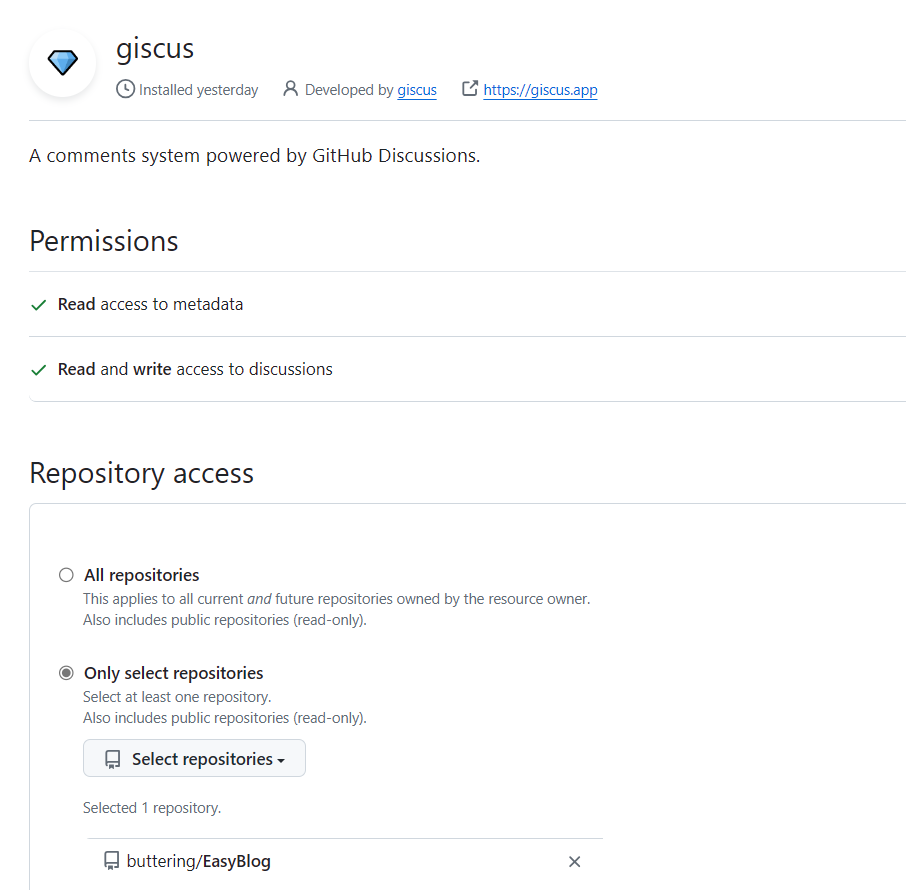
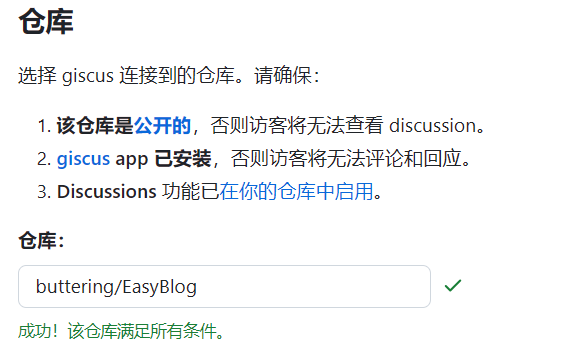
可以到 giscus仓库 检查自己的仓库是否满足giscus要求的条件。
配置插件
由于使用了fluid主题,因此只需修改配置文件即可开启评论。
修改 _config.fluid.yml:
1
2
3
4
5
6
7
8
9
10
11
12
13
14
15
16
17
18
19
20
21
22
23
| comments:
enable: true
type: giscus
giscus:
repo: buttering/EasyBlog
repo-id:
category: Announcements
category-id:
theme-light: light
theme-dark: dark
mapping: title
reactions-enabled: 1
emit-metadata: 0
input-position: bottom
lang: zh-CN
|
在配置基于 Github Discussions 的博客评论系统时(例如 giscus),往往需要获取 repo 的 repo-id, category-id 等属性,因此这里介绍一种获取这些信息的方法
首先打开以下 Github Docs 地址:Github Docs Explorer,然后授权 Github 账户,并输入以下内容
1
2
3
4
5
6
7
8
9
10
11
| {
repository(owner: "userName", name: "repoName") {
id
discussionCategories (first: 5) {
nodes {
name
id
}
}
}
}
|
- 将
userName 换成具体的 Github 用户名;
- 将
repoName 换成保存评论数据的 Repo 名称。
点击运行按钮,即可得到形如 "id": "R_kgDOKjFfn1" 和 DIC_kwdOJPFfnc4CU9... 就是我们需要的 repoId 和 categoryId。
因为网站中文章的url是直接使用文章名进行定位的,如 https://buttering.github.io/EasyBlog/2022/10/15/使用plotly离线模式报错UnicodeEncodeError:gbk codec can't encode character in position的解决方法/,如果 mapping: 的值设为 pathname 或者 url,其在 github discussions中出现的标题,中文会被base64字符代替,严重影响观感,设为 title 可以解决这个问题。
6. 实现访问统计
参考Hexo-fluid主题设置统计博客阅读量与评论 - 贾明晖的博客 (minghuijia.cn)
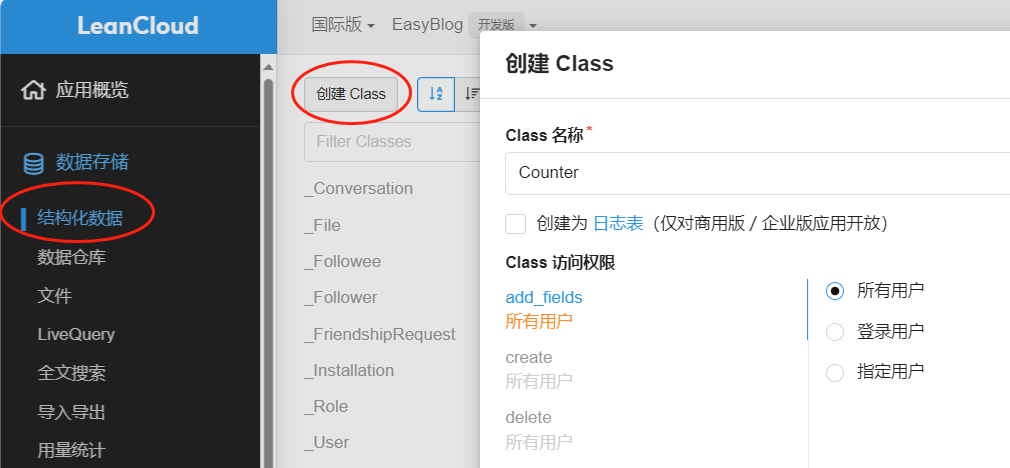
到LeanCloud注册一个免费账户,创建一个开发板应用后,再创建一个Class(依次点击数据存储->结构化存储->创建Class),权限给到最大。
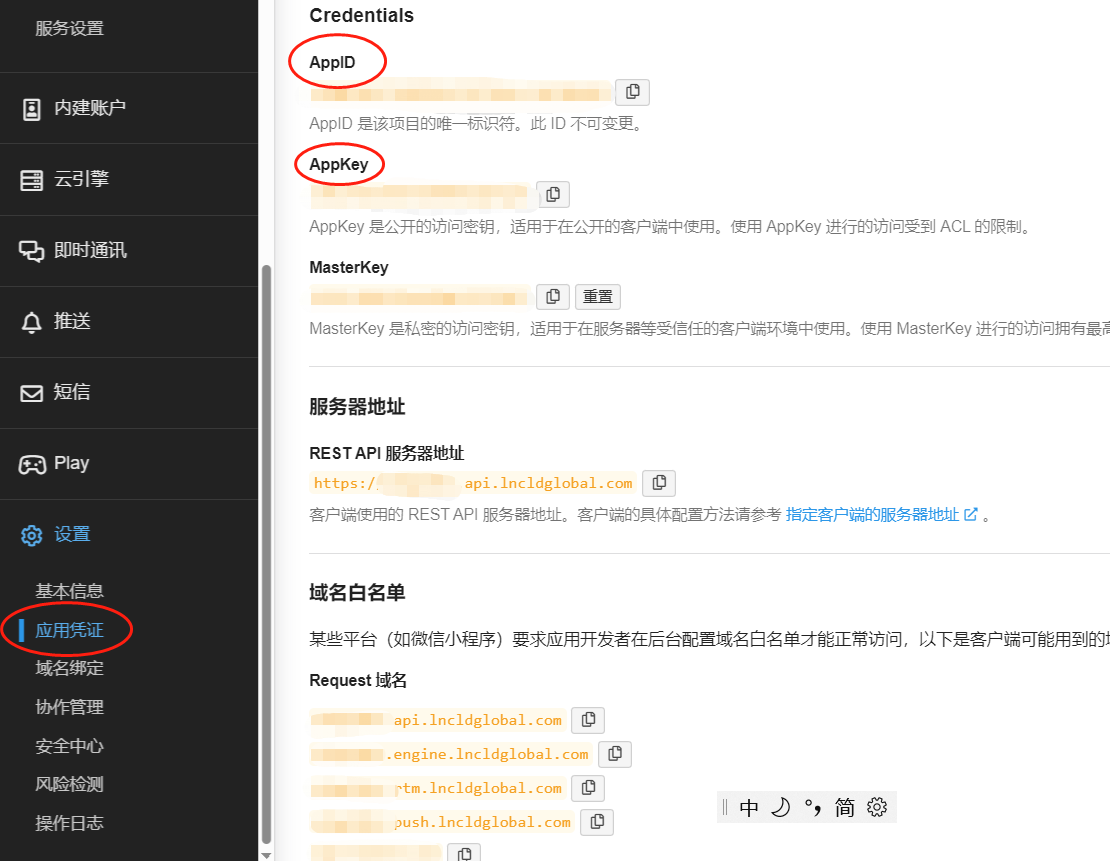
然后在设置->应用凭证里找到AppID与AppKey。
修改 _config.fluid.yml:
1
2
3
4
5
6
7
8
9
10
11
12
13
14
15
16
17
18
19
|
web_analytics:
enable: true
leancloud:
app_id: udXg28eCJ44kXbVz5tZCXqLs-MdYXbMMI
app_key: I8cwTxLkK5cFUXnRVazQrup5
server_url:
path: window.location.pathname
ignore_local: false
footer:
statistics:
enable: true
|
7. 网站运行时长
参考Fluid 页脚增加网站运行时长 - Hexo Theme Fluid (fluid-dev.com)
修改 _config.fluid.yml:
1
2
3
4
5
6
7
8
9
10
11
| footer:
content: '
<a href="https://hexo.io" target="_blank" rel="nofollow noopener"><span>Hexo</span></a>
<i class="iconfont icon-love"></i>
<a href="https://github.com/fluid-dev/hexo-theme-fluid" target="_blank" rel="nofollow noopener"><span>Fluid</span></a>
<div style="font-size: 0.85rem">
<span id="timeDate">载入天数...</span>
<span id="times">载入时分秒...</span>
<script src="/js/duration.js"></script>
</div>
'
|
content 前三行是 Fluid 原有的页脚内容,建议不要删除,可稍作修改,保留 Fluid 的超链接,用于向更多人推广主题。
新增的div标签用于实现功能。duration.js 包含的是功能代码,我们在博客目录的 source/js 下创建 duration.js (如果没有js目录,创建即可),
如果直接创建source/js/duration.js 是无效的
针对fluid 1.9.7: 需要将 content 的 <script src="/js/duration.js"> 这行改为 <script src="<项目根目录名>/js/duration.js">,如 <script src="/EasyBlog/js/duration.js"></script>
js文件内容如下:
1
2
3
4
5
6
7
8
9
10
11
12
13
14
15
16
17
18
19
20
21
22
23
24
25
26
27
28
29
30
31
| !(function() {
var start = new Date("2020/01/01 00:00:00");
function update() {
var now = new Date();
now.setTime(now.getTime()+250);
days = (now - start) / 1000 / 60 / 60 / 24;
dnum = Math.floor(days);
hours = (now - start) / 1000 / 60 / 60 - (24 * dnum);
hnum = Math.floor(hours);
if(String(hnum).length === 1 ){
hnum = "0" + hnum;
}
minutes = (now - start) / 1000 /60 - (24 * 60 * dnum) - (60 * hnum);
mnum = Math.floor(minutes);
if(String(mnum).length === 1 ){
mnum = "0" + mnum;
}
seconds = (now - start) / 1000 - (24 * 60 * 60 * dnum) - (60 * 60 * hnum) - (60 * mnum);
snum = Math.round(seconds);
if(String(snum).length === 1 ){
snum = "0" + snum;
}
document.getElementById("timeDate").innerHTML = "本站安全运行 "+dnum+" 天";
document.getElementById("times").innerHTML = hnum + " 小时 " + mnum + " 分 " + snum + " 秒";
}
update();
setInterval(update, 1000);
})();
|
把 start 的时间改为自己的时间即可。